
前言
随着某些技术的升级,IP被认证的概率越来越大,但是IP被认证了并不代表着就不能用了。在IP被认证的时候可以使用CDN来中转流量,以继续使用被认证的IP。
使用
准备工作
申请域名,一般来说,我们使用免费的域名注册商freenom.com,在freenom可以免费申请cf,ga,ml,tk域名。
注册cloudflare帐号:cloudflare
按照提示在freenom将域名的NS服务器设置为cloudflare的NS服务器。
在cloudflare的DNS设置中,将A记录指向自己的IP。
v2ray服务端设置。
服务端安装使用官方脚本
apt update
apt install curl
bash <(curl -L -s https://install.direct/go.sh)
服务端设置
vi /etc/v2ray/config.json
把自带的配置全删掉,复制以下内容进去
{
  "log": {
    "access": "/var/log/v2ray/access.log",
    "error": "/var/log/v2ray/error.log",
    "loglevel": "info"
  },
  "routing": {
    "rules": [
      {
        "type": "field",
        "ip": [
          "0.0.0.0/8",
          "10.0.0.0/8",
          "100.64.0.0/10",
          "127.0.0.0/8",
          "169.254.0.0/16",
          "172.16.0.0/12",
          "192.0.0.0/24",
          "192.0.2.0/24",
          "192.168.0.0/16",
          "198.18.0.0/15",
          "198.51.100.0/24",
          "203.0.113.0/24",
          "::1/128",
          "fc00::/7",
          "fe80::/10"
        ],
        "outboundTag": "blocked"
      }
    ]
  },
  "inbounds": [
    {
      "port": 10000,
      "listen": "0.0.0.0",
      "protocol": "vmess",
      "settings": {
        "clients": [
          {
            "id": "6d8a82b9-94d6-442e-a340-2b9cd5752c77",
            "alterId": 4
          }
        ]
      },
      "streamSettings": {
        "network": "ws",
        "wsSettings": {
          "path": "/phpmyadmin"
        }
      }
    }
  ],
  "outbounds": [
    {
      "protocol": "freedom"
    },
    {
      "protocol": "blackhole",
      "tag": "blocked"
    }
  ]
}
运行service v2ray start来启动 V2Ray 进程; 之后可以使用service v2ray start|stop|status|reload|restart|force-reload控制 V2Ray 的运行
安装并设置nginx
centos
yum update
yum install nginx -y
debian/ubuntu
apt update
apt install nginx -y
有些debian/ubuntu系统可能自带apache2,此时应卸载apache2
apt remove apache* -y
修改nginx默认配置
vi /etc/nginx/sites-available/default
# 在 server 内插入以下内容,同时开启 error_page
location /phpmyadmin {
          proxy_redirect off;
          #proxy_pass http://127.0.0.1:10000;
          proxy_http_version 1.1;
          proxy_set_header Upgrade $http_upgrade;
          proxy_set_header Connection "upgrade";
          proxy_set_header Host $http_host;
          proxy_intercept_errors on;
          if ($http_upgrade = "websocket" ){
             proxy_pass http://127.0.0.1:10000;
          }
        }
重启nginx。
service nginx restart
客户端安装
Windows图形客户端
在https://github.com/2dust/v2rayN/releases查看并下载v2rayN-Core.zip,解压之后打开v2rayN.exe。
点击服务器→添加[VMess]服务器

如图进行设置
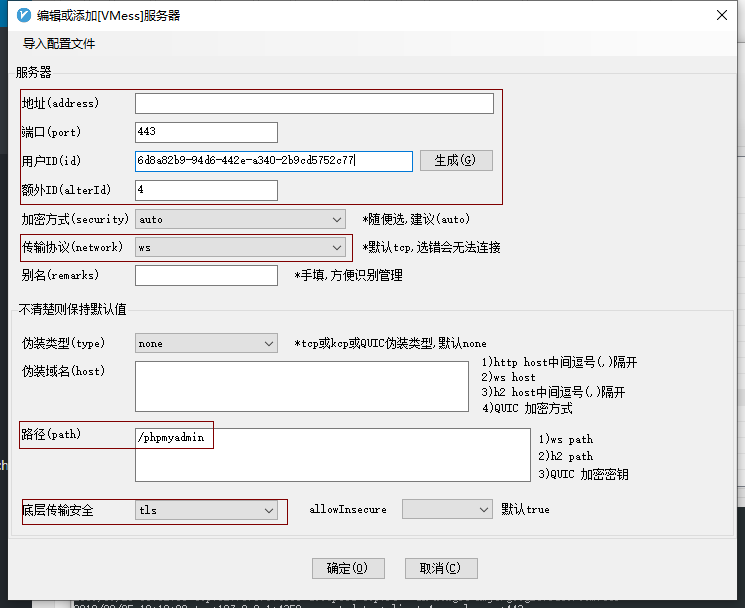
地址栏输入你的域名。
在v2ray的托盘区图标上点右键,启动http代理,即可实现cdn代理。
此时启用你的客户端,应该就可以实现利用CDN中转了。
手动配置v2ray
在https://github.com/v2ray/v2ray-core/releases查看并下载适合于自己系统的程序。
(注:V2RAY客户端和服务端一体,只是配置方式的不同,因此此处服务端和客户端在同一个地方下载,但是服务端和客户端的系统可能不同,因此应下载不同版本的程序。
修改config.json配置为以下内容,注意 address(第27行)填写网站域名。
{
  "log": {
    "access": "",
    "error": "",
    "loglevel": ""
  },
  "inbounds": [
    {
      "tag": "in",
      "port": 1080,
      "listen": "0.0.0.0",
      "protocol": "socks",
      "settings": {
        "auth": "noauth",
        "udp": true,
        "ip": "127.0.0.1"
      }
    }
  ],
  "outbounds": [
    {
      "tag": "agentout",
      "protocol": "vmess",
      "settings": {
        "vnext": [
          {
            "address": "你的域名",
            "port": 443,
            "users": [
              {
                "id": "6d8a82b9-94d6-442e-a340-2b9cd5752c77",
                "alterId": 4
              }
            ]
          }
        ]
      },
      "streamSettings": {
        "network": "ws",
        "security": "tls",
        "wsSettings": {
          "path": "/phpmyadmin"
        }
      },
      "mux": {
        "enabled": true
      }
    },
    {
      "protocol": "freedom",
      "tag": "direct"
    }
  ],
  "dns": {
    "servers": [
      "8.8.8.8",
      "8.8.4.4",
      "localhost"
    ]
  },
  "routing": {
    "domainStrategy": "IPIfNonMatch",
    "rules": [
      {
        "type": "field",
        "outboundTag": "direct",
        "ip": [
          "0.0.0.0/8",
          "10.0.0.0/8",
          "100.64.0.0/10",
          "127.0.0.0/8",
          "169.254.0.0/16",
          "172.16.0.0/12",
          "192.0.0.0/24",
          "192.0.2.0/24",
          "192.168.0.0/16",
          "198.18.0.0/15",
          "198.51.100.0/24",
          "203.0.113.0/24",
          "::1/128",
          "fc00::/7",
          "fe80::/10"
        ]
      },
      {
        "type": "field",
        "outboundTag": "direct",
        "domain": [
          "geosite:cn"
        ]
      },
      {
        "type": "field",
        "outboundTag": "direct",
        "ip": [
          "geoip:cn"
        ]
      }
    ]
  }
}
指定IP加速
另外由于使用CDN中转之后链接速度会很慢,因此可以通过指定IP的方法来提升速度。
cloudflare指定IP的方法:https://imgki.com/archives/28.html
这种方法较为麻烦,但是可以使得所有访问这个域名的用户都可以获得加速,但是如果只是你自己使用这个IP加速,并不需要这么麻烦,可以直接配置指定IP。
将地址(address)设置为指定的IP,伪装域名设置为你的域名
再次运行客户端应该可以看到加速成功了。
可用于加速的IP可以参考:https://imgki.com/archives/28.html
参考链接:
https://github.com/iMeiji/shadowsocks_install/wiki/Project-V-%E9%85%8D%E7%BD%AE-WebSocket-TLS-Web-CDN
https://imgki.com/archives/28.html
博主,在freenom注册的tk域名,为什么我在cloudflare添加网站提示域名未注册,不能添加,是不是freenom那边注册还需要等待呀。我在个人中心里面看到了我购买的免费域名,但是搜索可用性里面还有这个域名。。。
可以试试GA之类的域名